FOOD | HEALTH | SPIRITUALITY

Sign Up For Your BONUS GIFT!

Welcome to Sacred & Delicious! I’d like to reward your interest with two valuable gift:

The Sacred & Delicious Food List

The Sacred & Delicious Food List is an addendum to the cookbook, Sacred & Delicious. Author Lisa Mitchell decided to distribute this comprehensive list of the foods through her website so that she would be able to update it more easily. These are foods found in most modern kitchens. The list organizes the foods into categories to reflect how they fit in your diet from an Ayurvedic perspective.


While you wait for the book, enjoy reading the monthly updates on our blog,
Don’t miss out on monthly updates from the Sacred & Delicious Blog: Food • Health • Spirituality


  • Please select the house
  • This field is for validation purposes and should be left unchanged.

Sign up now for our Sacred & Delicious Blog

Receive our bonus gift: Sacred & Delicious food list!


  • Please select the star
  • This field is for validation purposes and should be left unchanged.

Thanksgiving Traditions for GF-Vegans
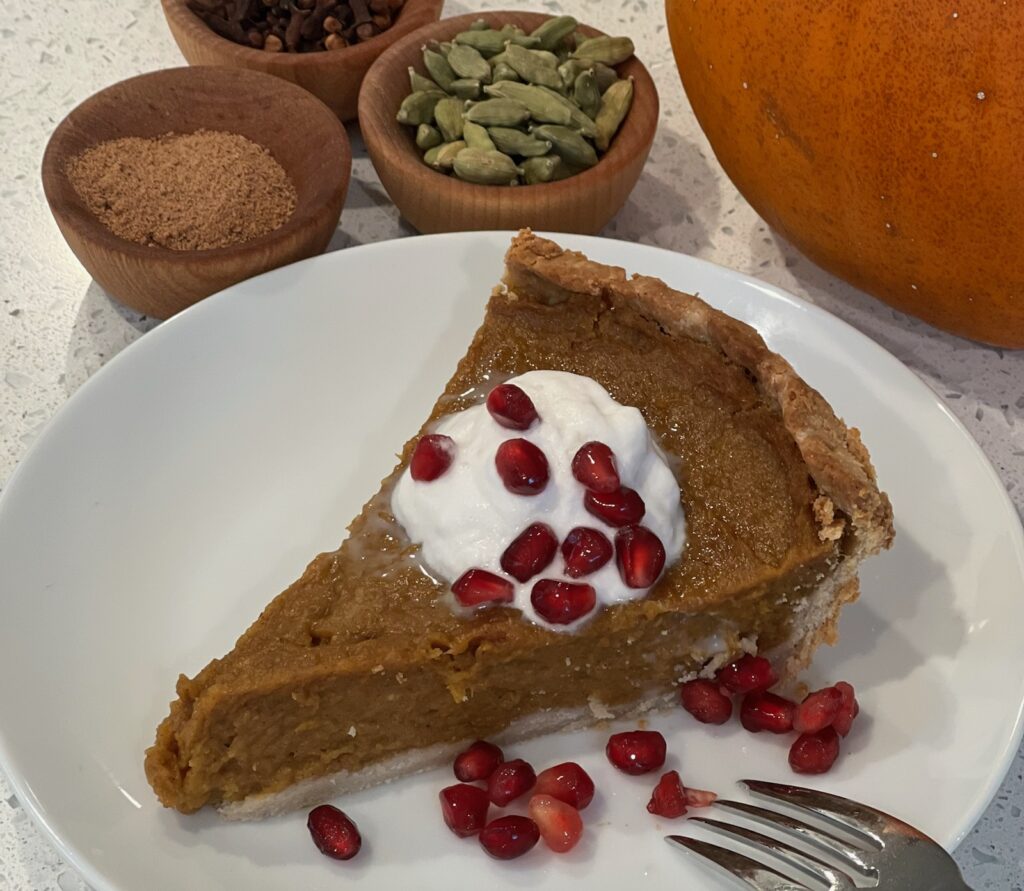
Photo by Ingrid Beckman


No more turkey for us, but I still crave a good pumpkin pie, and with that in mind, I joyfully present the Sacred & Delicious approach to Vegan and Gluten-Free Pumpkin Pie! Our diets may change dramatically as we evolve from omnivore to vegetarian to vegan, but the longing for certain Thanksgiving traditions remains the same.

The Filling

I was determined to meet three criteria when developing this recipe: the pie must be delicious, healthy, and beautiful on the plate. In other words, in spite of the limitations of vegan and gluten-free baking, the recipe has to actually work. Will a piece of pie that has no eggs as a binder be able to sit upright on a plate? The answer is a resounding “Yes!”

To keep the pie delicious and healthy, I start by baking a sugar pumpkin, a smaller pumpkin than the regular field pumpkins used for carving. I prefer fresh pumpkin to canned because—well, because it’s fresh! It will take 10 minutes to scrape out the seeds and surrounding pulp in which they’re embedded, but then you can walk away as it bakes.

Using fresh pumpkin for a vegan pie could be problematic because fresh tends to be more watery than canned. To dry it out, I bake the pumpkin for an hour, which is longer than you’d expect. I then strain the cooked pumpkin before using it in the filling. The other challenge is how to bind the liquid filling without eggs. I used a combination of psyllium husk and tapioca starch in this version. (Out of curiosity, the next time I make it, I’ll use only psyllium.)

The Crust

I’ve never found a pre-made, store-bought GF crust that is also vegan. For this reason, I was determined to make my own crust this year—even though I’m not an expert baker. I have yet to perfect lovely, fluted ridges for a picturesque crust. However, this crust does its job holding the yummy, spiced pumpkin filling, and it’s also tasty.

You could use a gluten-free mix for the crust, but I find these mixes to be too high in starch (potato starch, tapioca, rice flour, guar gum, etc.) so I avoid them. I prefer to add at least a little bit of nutritional value to my crusts. In this experiment I used King Arthur Gluten-Free Multipurpose Flour, sweet sorghum, and almond flour.

Season of Gratitude

As another holiday season begins, let me close by thanking each of you for your enthusiastic support of the Sacred & Delicious blog. Your commitment inspires me to continue sharing the wisdom of Ayurveda and its timeless principles of health, wellness, and delicious food.

As we gather around holiday tables with so much abundance, may we all remember to pause and give thanks. May everyone, everywhere, have enough nourishing food to eat—and may there be peace and harmony within and among nations. Happy Thanksgiving!

PS Two more favorite holiday dishes are these Holiday Sweet Potatoes with Glazed Pecans—beyond delicious! And Holiday Dressing (Sacred & Delicious: A Modern Ayurvedic Cook, page 164).  Looking for more GF pumpkin dishes? Try any of these amazing dishes:  Chocolate Pumpkin Squares, Spiced Pumpkin Pound Cake, and Pumpkin Soup.
Print

VEGAN/GF PUMPKIN PIE

Makes enough for one 9-inch pie plate
Preparation Time: 4 to 5 hours start to finish (1.5 hours active)

No doubt that making a pie from scratch is always a project! Even so, it’s a project of love that can be a lot of fun as you create memories with family and friends each holiday season.

For the Filling
1 sugar pumpkin (5 pounds), baked and puréed (3 cups)
2 tablespoons psyllium husk
3 tablespoons tapioca starch
2 teaspoons ground cinnamon
¾ teaspoon ground cardamom
½ teaspoon ground cloves
¼ to ½ teaspoon ground nutmeg
1½ to 2 teaspoons freshly grated ginger
¾ tsp salt
1¼ cups coconut sugar
1 cup whole fat coconut milk
2 teaspoons vanilla extract

For the Single Crust
4 to 6 tablespoons ice water
7 to 8 tablespoons coconut oil
½ cup King Arthur Gluten-Free Multipurpose Flour
1 cup sifted almond flour
½ cup sweet sorghum flour
2 tablespoons psyllium husks
2 tablespoons tapioca starch
¼ teaspoon xanthan gum
½ teaspoon mineral salt
2 tablespoons vegan sour cream 
½ tablespoon (1½ teaspoons) apple cider vinegar
1 tablespoon pure maple syrup

For the Topping
2 cups Vegan Whipped Cream (recipe in Sacred & Delicious, page 241)
¼ cup pomegranate seeds (optional)

Cook’s Tip: 1. Use 2.5 cups pumpkin in a 9-inch pie pan or 3 cups in a 9.5 or 10-inch pie pan. 2. I prefer mixing the dough by hand because it’s easy to over-process gluten-free flours in a food processor, making the crust tough.

1. Prepare the pumpkin: Adjust the oven rack to the lower-middle position and preheat oven to 450˚F. Cut the pumpkin in half and scoop out the seeds and surrounding pulp strands. Cover the bottom of a 9×12 (or larger) baking dish with a piece of parchment paper. Place the pumpkin halves with the flesh down on the paper, and cover with foil. Bake for 1 hour or until the pumpkin flesh is completely tender when you poke it with a fork. Let it cool for 30 minutes or longer. Scoop the flesh out of the shell, and purée the flesh in a food processor. Check to make sure there are no lumps; if you find lumps, pulse again until the purée is completely smooth. Move the purée to a strainer and strain over a mixing bowl for at least 10 minutes. Set aside 2 ½ cups of the purée.

2. Prepare the crust: Chill water in freezer at least 15 minutes in advance if you don’t have refrigerated water or ice available. Measure coconut oil onto a plate; then place it in the refrigerator for 10 minutes only.

3. Whisk together the dry ingredients in a medium-sized mixing bowl.

4. Combine 4 tablespoons (¼ cup) of ice water in a separate bowl with the vegan sour cream, vinegar, and maple syrup. Add the liquid gradually to the flour mixture, mixing by hand until the dough comes together. Add coconut oil a tablespoon at a time to the flour mixture, blending the oil into the flour with a pastry cutter until the dough forms small crumbs. Add up to 4 more tablespoons of ice water until the dough becomes moist enough to gather into a ball.

5. Turn the dough onto a sheet of plastic wrap and flatten it into a round disk and wrap in plastic. Refrigerate for 1 hour or overnight. If you’ve chilled the dough for several hours, remove it from the refrigerator ½ hour before rolling, giving the dough a chance to soften slightly. Roll the dough to 12-inches in diameter between two large sides of plastic wrap. (Use one large sheet of plastic wrap, placing it so that it’s both above and below the dough as you roll it out. Make sure the sheet of plastic wrap is large enough to cover the dough, above and below, when it’s fully rolled out.) (You may need to put two pieces of plastic wrap together for both top and bottom sheets to be large enough.) After rolling out the dough, take off the top sheet of plastic wrap and gently invert the dough over the pie plate. Then carefully lift off the second sheet of plastic wrap as you press the dough into the pan with your other hand. Trim off the excess dough before creating fluted edges. Put the pie pan with its raw crust into the freezer for 30 minutes to an hour before pouring the filling into the crust.

6. Prepare for baking: Preheat the oven to 425°F and adjust the oven rack to one level lower than the middle position.

7. Prepare the filling: Combine the arrowroot, spices, and salt in a small bowl and set aside. Combine the pumpkin puree with the sugar, coconut milk, and vanilla in a stand mixer or large mixing bowl. Blend on moderate speed in the stand mixer or with a handheld mixer until well combined. Add the dry ingredients and mix well.

8. Bake the pie: Pour the filling into the crust. If you haven’t moved the oven rack down, then at this point cover the edges of the crust with a pie shield to avoid the crust’s burning. (Alternatively, you can make a do-it-yourself pie shield by creating an aluminum foil cover for the edges of the crust.) Bake the pie at 425°F about 30 minutes. Reduce the temperature to 325°F for an additional 30 minutes or more—until the center moves only slightly when jiggled. Let the pie cool on a rack for 1 to 2 hours. Cut with a straight-edged knife. Serve warm or chill first and serve later at room temperature with a sprinkling of pomegranate seeds (optional) and/or a dollop of Vegan Whipped Cream (see page 241 in Sacred & Delicious.)

Ayurvedic Note: Eating this pie in moderation is fine for the holiday, especially for vata and pitta. Moderation is the key always! Coconut milk and sugar increase kapha, but coconut is better for kapha than dairy products. Cardamom with food helps alleviate kapha.

Increase cardamom to 1 teaspoon.

Leave a Reply

Your email address will not be published. Required fields are marked *

Loading...